Client Portal Overview
At Storen Financial, we use a secure Client Portal to store all your documents. Find the how-to instructions for accessing and utilizing your portal below…
- Upload and Download All of Your Client Documentation
- Initial Client Portal Setup
- How to Reset Your Password
- Accessing the Portal through Two-Factor Authentication
- How to Navigate the Client Portal
- How to Navigate Your Client Portal via Mobile Browser
Upload and Download All of Your Client Documentation
What is your secure Client Portal and why is it important?
The Client Portal is an online filing cabinet, where you can access all of your financial documents, such as completed tax returns, statements, business reports, and more. This online tool is also the best way to send us your documents safely and securely, as sending documents via email poses a major security risk to you and can lead to identity fraud. Simply upload your documents to the portal, and they are instantly accessible to our team. This will help you collect everything you need all in one place!
What are the best practices for uploading to the portal?
Once our team sets up your Client Portal account, you can freely download any and all returns or reports, and upload documents needed for future tax returns or financial meetings as you receive them. For example, if you receive a Q2 quarterly payroll report, you can drop it in the folder for next tax season. Receive a 1099 form? Drop it in your folder when it’s ready!
However, for ease and convenience, we do recommend that if you know you will be receiving multiple documents in the same general time frame, wait to upload them all at once. This will limit the emails you receive from us confirming we’ve received your documents as well as allows us to complete your designated service in a timely, efficient manner.
Initial Client Portal Setup:
- The Storen Financial team will set up your Client Portal using your preferred email address.
- We will notify you when this process has been completed.
- You will then need to reset your password in order to access the documents.
How to Reset Your Password:
- Visit the Client Portal link (click here).
- Click “Forgot password.”
- Choose email when asked how you want to receive your link.
- Enter your email address. Please note this must be your preferred email address used in the initial setup.
- Watch for the email from Revver (the Client Portal). Click the password recovery link in the email.
- Create your new password. Please create a strong password of at least 15 characters, as this is a direct link to access your financial information. Use upper and lower case letters, characters, and numbers.
- Confirm the password, and then click “Save new password.”
- Accept terms of use in order to proceed (This is for initial setup only). *You may be asked to download the app or enter your phone number at this step. You can dismiss this prompt and proceed to the next step.
- Login with your new password.
Accessing the Portal through Two-Factor Authentication
Storen Financial uses Two-Factor Authentication as a secondary layer of protection to maintain the security of your financial documents within your Portal. This beneficial tool helps prevent hackers from accessing your account by sending a code to your email for your approval.
Each time you access your Client Portal, you will be required to use Two-Factor Authentication with these steps:
- After entering your username and password, an email will be sent to your account email with a two-factor code.
- In your email inbox, you should receive an email titled “Revver Security Code.”
- Open this email and copy the six-digit code.
- Return to the two-factor authentication screen in Revver and paste the code.
- Then, click on the purple “Sign In” button.
Additional Tips:
- Your code will be sent in a minute or less and will expire in 10 minutes. If you do not see it in your inbox, check your junk folder or try resending.
- Note: Occasionally a previous Two-Factor code will autofill into the code box. You will need to make sure to delete this and use the most recently emailed code.
How to Navigate the Client Portal:
There are a lot of different ways to use this tool, but here are the basic ways to navigate to the information you need…
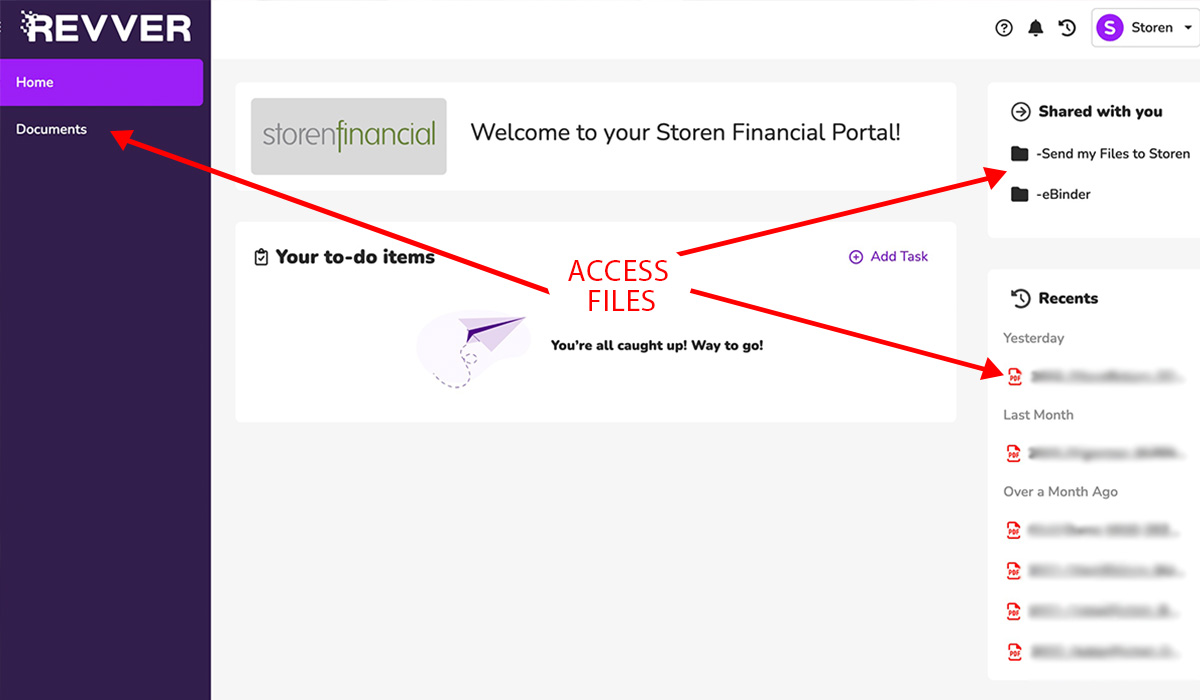
Home Screen
- When you log into Revver, you will immediately see your home screen.
- To access your file folders, you will want to click one of the file folders at the top right of your screen under the label, “Shared With You.”
File Folder Names
- eBinder – Location where your digital files are stored.
- Send my Files to Storen – Location where you drag/drop or upload your files to send to us securely.
- Storen Financial – Initial location for the eBinder and Send my Files to Storen folders. *You will see this on the crumb trail above your folders.
- Why do I have multiple folders? – If you own a business, you will have multiple folders with the same name, as individual and business documents are separate.
File Folder Icons
- These are the folders with information in your digital file cabinet.
- Dark icon indicates there are files in this folder.
- White icon indicates that the folder is empty.
- Double click on the folder to access the information.
Uploading Files
- Double click on the Send my Files to Storen folder.
- Inside this folder you are able to drag and drop your files or click the file icon in the center to select files from your computer for upload.
- Once files are uploaded and appear in the Send my Files to Storen folder, you’re done and they are now accessible to our team.
- A Storen team member will reach out to you as soon as possible to let you know we’ve received your documents.
- Please note: Images coming into the client portal need to be in jpg or pdf format. We do not accept any Apple software such as Pages or Numbers. To export these documents, utilize the export option under the File tab in these programs.
Accessing Files
- Double click on the eBinder folder name. Inside this folder are additional folders (Tax, Investment, etc).
- Double click on the folder you want to access.
- Inside that folder, documents are broken down by year. Double click the year you want to access.
- To view the pdf document, you will need to download it. Double click the pdf to start the download.
Navigating Backward
- Click the “crumb trail” at the top to move backward out of the folders. [For example, if you are in your Tax folder for 2020 (“Storen Financial> -eBinder > Tax > 2020”), click ‘Storen Financial’ to go back to the beginning. Or click “Tax” to go back to the Tax folder in order to click on another year.]
- Or click the Revver logo at the top to go to the beginning folder, i.e. Storen.
*Please note these instructions are for the desktop application only.
How to Navigate Your Client Portal via Mobile Browser:
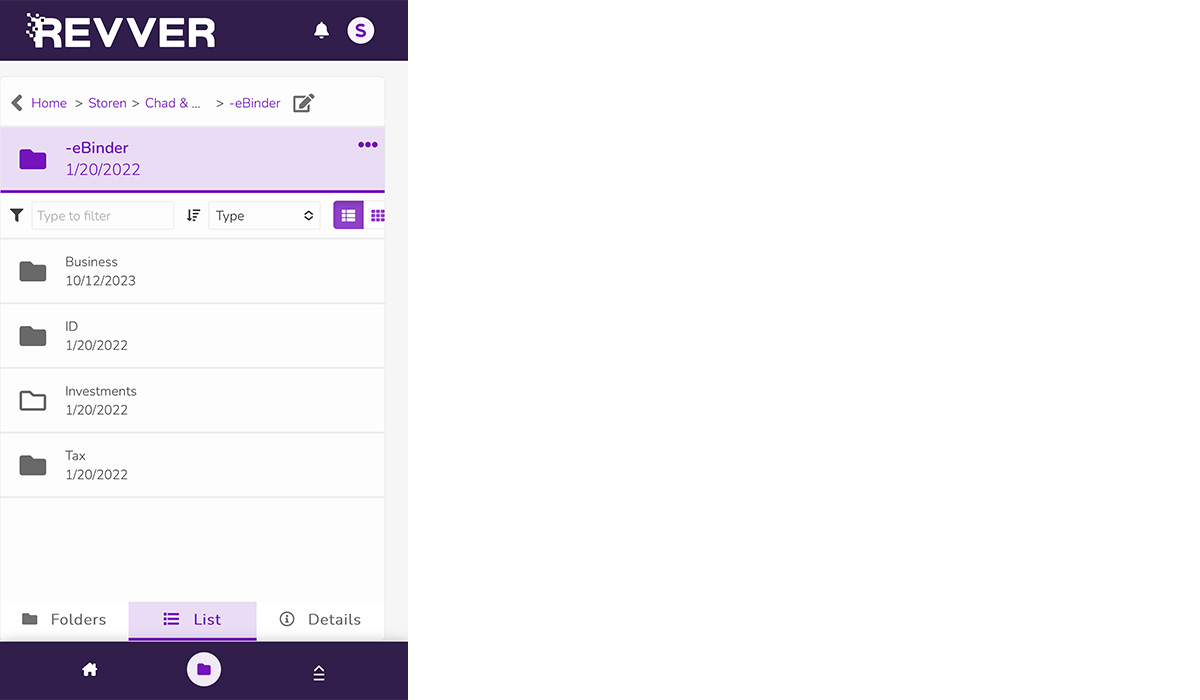
If you are accessing the Client Portal through your mobile browser, we recommend first creating your profile via the desktop browser, as it’s easier to view the terms of agreement this way. The mobile browser and desktop browser are very similar. However, here are some key differences to remember when navigating your portal:
- When you log in, you will see the same home screen you see on your desktop browser.
- You will see three icons at the bottom – the Home Screen, the Documents icon, and the All Features icon. For simplicity, you will need to use the Home Screen icon to access your files.
- From there, you can access your folders as usual. *The List view at the bottom of the screen should be selected.
- The other two views – Folders and Details – at the bottom are not accessible.
- Once you’ve uploaded your documents, simply close out your browser.
*Logging into your portal via your iPad or Kindle will allow you to operate your Client Portal the same way as the mobile browser.
Benefit of Using the Mobile Browser
If you have your tax documents saved on your photo library or Google Drive, using the mobile browser makes uploading them easier.
If you have any questions about this process, click here to contact us.
Blog by Amy White – Technology Manager
Learn more about Amy and the rest of the Storen Financial team here.


